The chat box on the bottom right is a text or voice chat AI agent and the phone number lets you call the assistant.
You can get it to help you with setup of email on your phone or computer.
If you try it and have feedback on how the experience went we’d be happy to hear about that.
Email Setup Instructions
Expand for your desired device
IOS - IPhone/ Ipad
1 – Select "settings" from your home screen.
2 – Select the "mail" option from the settings menu.
3 – Select the "accounts" option from the mail menu.
4 – Select the "add account" option from the accounts menu.
5 – Select the "other" option from the add account menu
6 – Enter your provided email account information, Then select "next".
7 – Tap IMAP, server information (incoming & Outgoing) Ports: Incoming 993 | Outgoing 465 ax.email Enter email address and password, then select "next".
8 – Select "Save".
9 – Go back to you home screen and select the "Mail" app.
10 – If email setup was successful the mail should should download if there is any.
Step by step screenshots
Click to Enlarge
Step 1
Step 2
Step 3
Step 4
Step 5
Step 6
Step 7
Step 8
Step 9
Step 10
Android
1 – Launch the Settings app on your device, Once it launches, tap on Cloud and Accounts.
2 – On the next screen, tap Accounts.
3 – Tap on Add Account, Then Select Personal (IMAP), near the bottom of the screen, as the Account Type.
4 – Enter your email address
5 –Enter your password
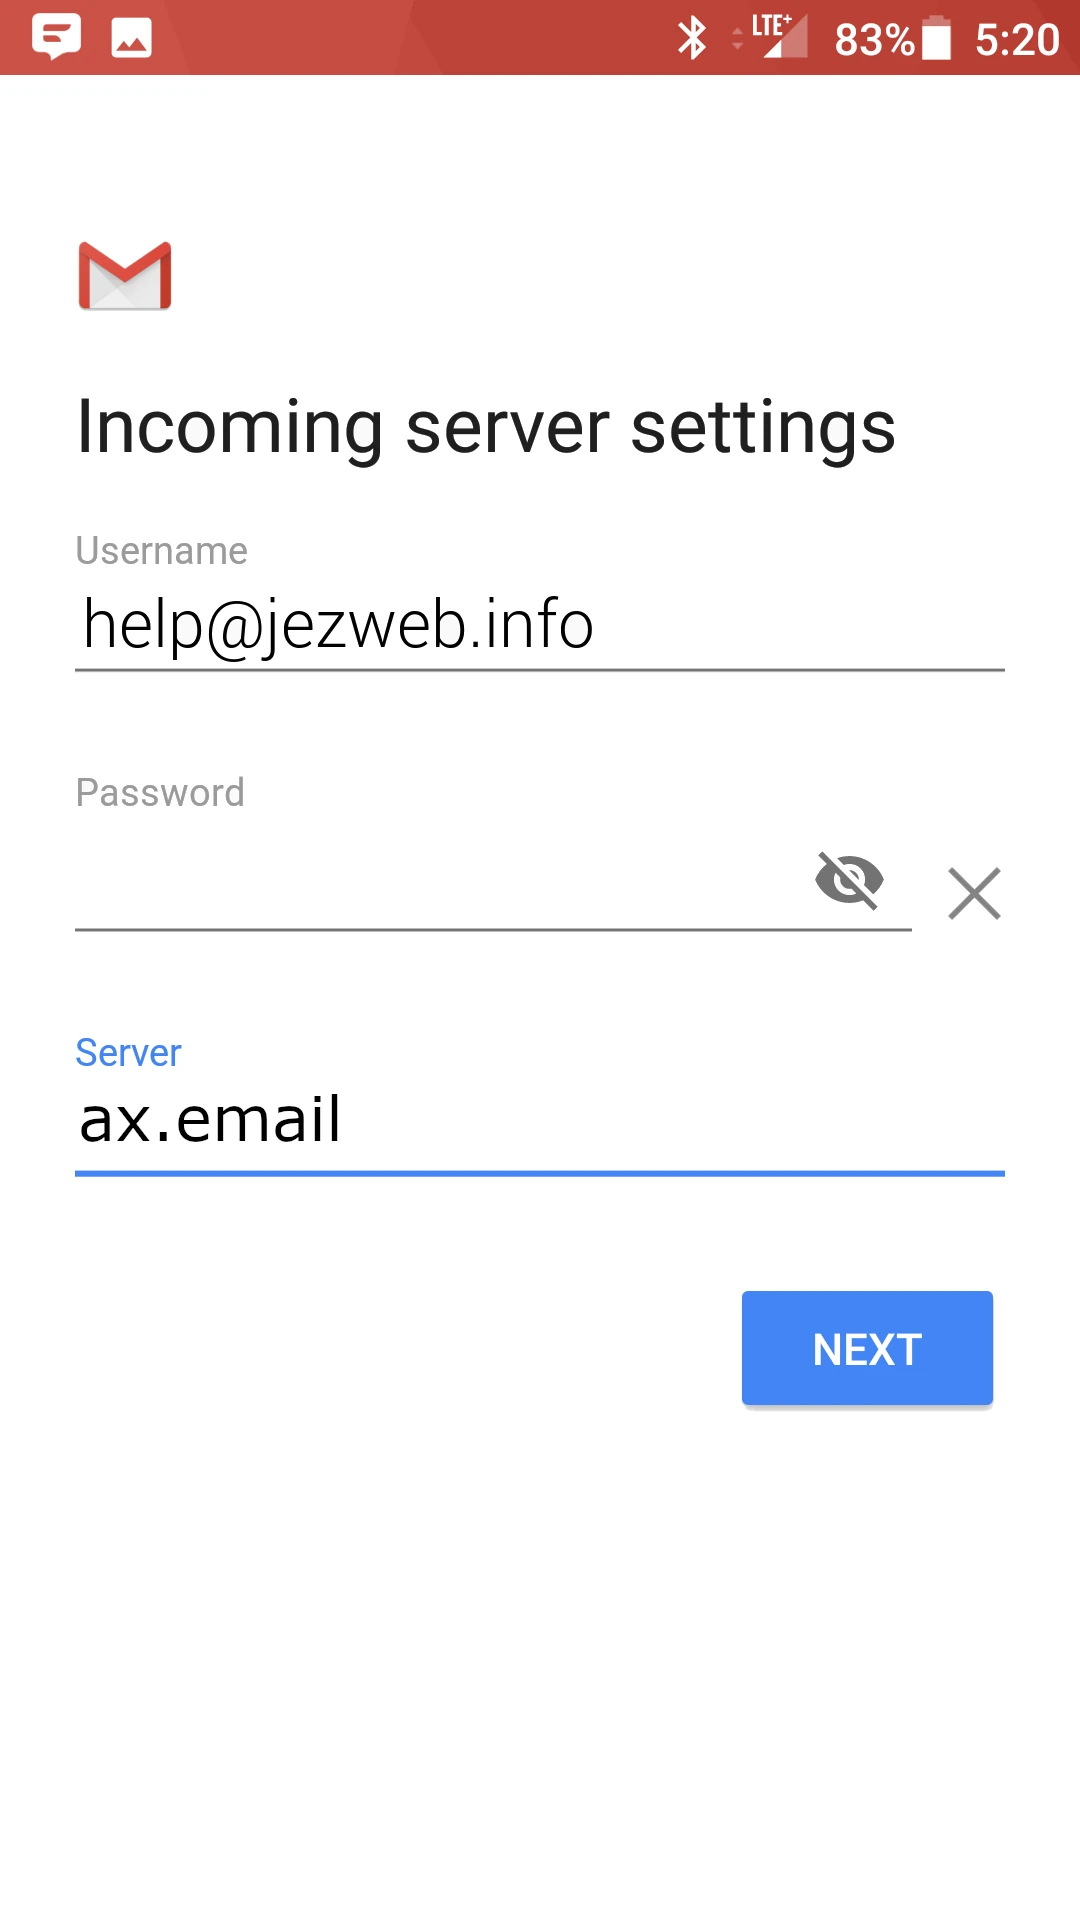
6 – Enter the following incoming settings: Username: Your Email Address Password: Your mailbox password Server Information: ax.email Tap Next
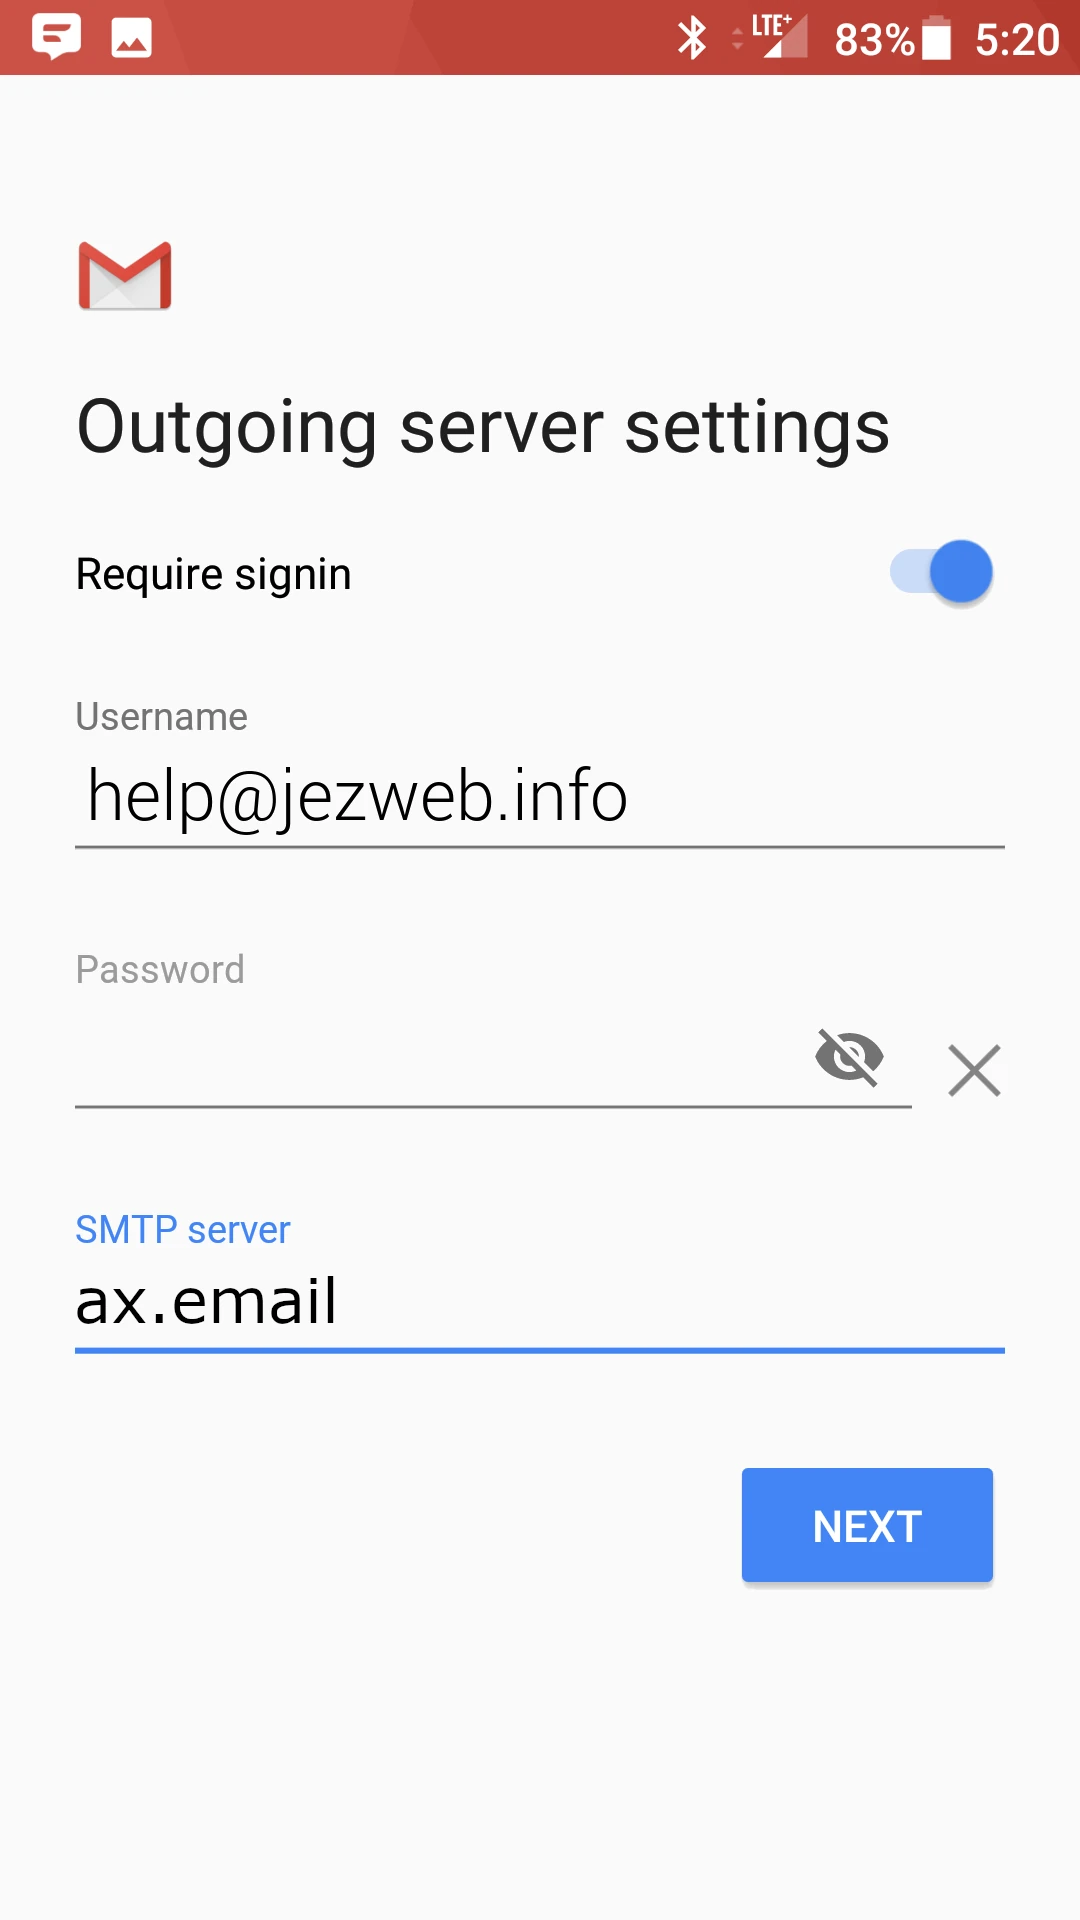
7 – Enter the following outgoing settings: Make sure Require signin is enabled. Username: Your Email Address Password: Your mailbox password SMTP Server: ax.email Tap Next
8 – Select the options desired, and tap Next
9 – Account Name: Used to distinguish account from others in the device Your name: Name to be displayed in outgoing messages Tap Next
10 – You are all set! Go back to the main menu, open the Gmail app and your messages should start syncing. Please give it a few minutes to download data before troubleshooting.
Step by step screenshots
Click to Enlarge
Step 1
Step 2
Step 3
Step 4
Step 5
Step 8
Step 9
Outlook for Windows
1 – Search Control Panel in the search bar.
2 – Select the ” view by” option and select large icons.
3 – Select the “Mail (Microsoft Outlook)” icon.
4 – The email profiles window will appear, Select Add.
5 – Give you new profile a name and click ok.
6 – Select “manual setup” and click next.
7 – Select POP or IMAP.
8 – Enter the following server details: Your name: Name shown on outgoing emails Email address: Your Email Address Account Type: IMAP ax.email Username: Your Email Address Password: Your mailbox password
9 – Select More Settings, Then select the outgoing server tab then check “my outgoing server (SMTP) requires authentication”.
10 – Select the advanced tab and enter port numbers Incoming server: 993 select SSL/TLS Outgoing server: 465 SSL/TLS then click ok.
11 – Select close
12 – Uncheck set up outlook mobile, then click finish
13 – You are all set! Go back to the main menu, open the Email app and your messages should start syncing. Please give it a few minutes to download data before troubleshooting
Step by step screenshots
Click to Enlarge
Step 1
Step 2
Step 3
Step 4
Step 5
Step 6
Step 7
Step 8
Step 9
Step 10
Step 11
Step 12
Step 13
Outlook for IOS
Download the Outlook for iOS app from the App Store
1 – Once it downloads; open it, and tap the blue Get Started button.
2 – Enter your email address
3 – Tap Add Account The app by default will use Exchange as the account type, we need to change it. Tap Not Exchange on the top right. Then tap Change Account Provider
4 – Select IMAP
5 –Enter your mailbox password and a description of the account Then enable the Advanced Settings slider
6 – Enter the following settings on the screen, as shown below: Email: Your Email Address Display Name: Your name Description: something to help you distinguish the account
IMAP Incoming Server: ax.email Username: Your Email Address Password: Your mailbox password Server Information: ax.email Once you’re done, click the checkbox on the top right corner
7 – Tap Maybe Later to skip adding another account.
8 – You may go through the app tutorial by clicking on the arrow on the bottom right, or tap Skip to skip it.
9 – Once you see the Inbox of your mailbox, you are all set! It may take a few minutes to download mail depeding on a variety of factors
Step by step screenshots
Click to Enlarge
Step 1
Step 2
Step 3
Step 4
Step 5
Step 7
Step 8
Step 9
Outlook for MacOSX
1 – Launch Outlook 2016 for Mac NOTE: If you do not have any accounts setup on Outlook 2016 for Mac, skip to Step 5 Select Preferences from the Outlook menu.
2 – Select Accounts
3 – Select Add Email Account
4 – Enter your email address
5 – Outlook will sometimes automatically select Exchange as the account type. Click on Not Exchange on the top right corner to switch the account type
6 – Select IMAP/POP at the bottom
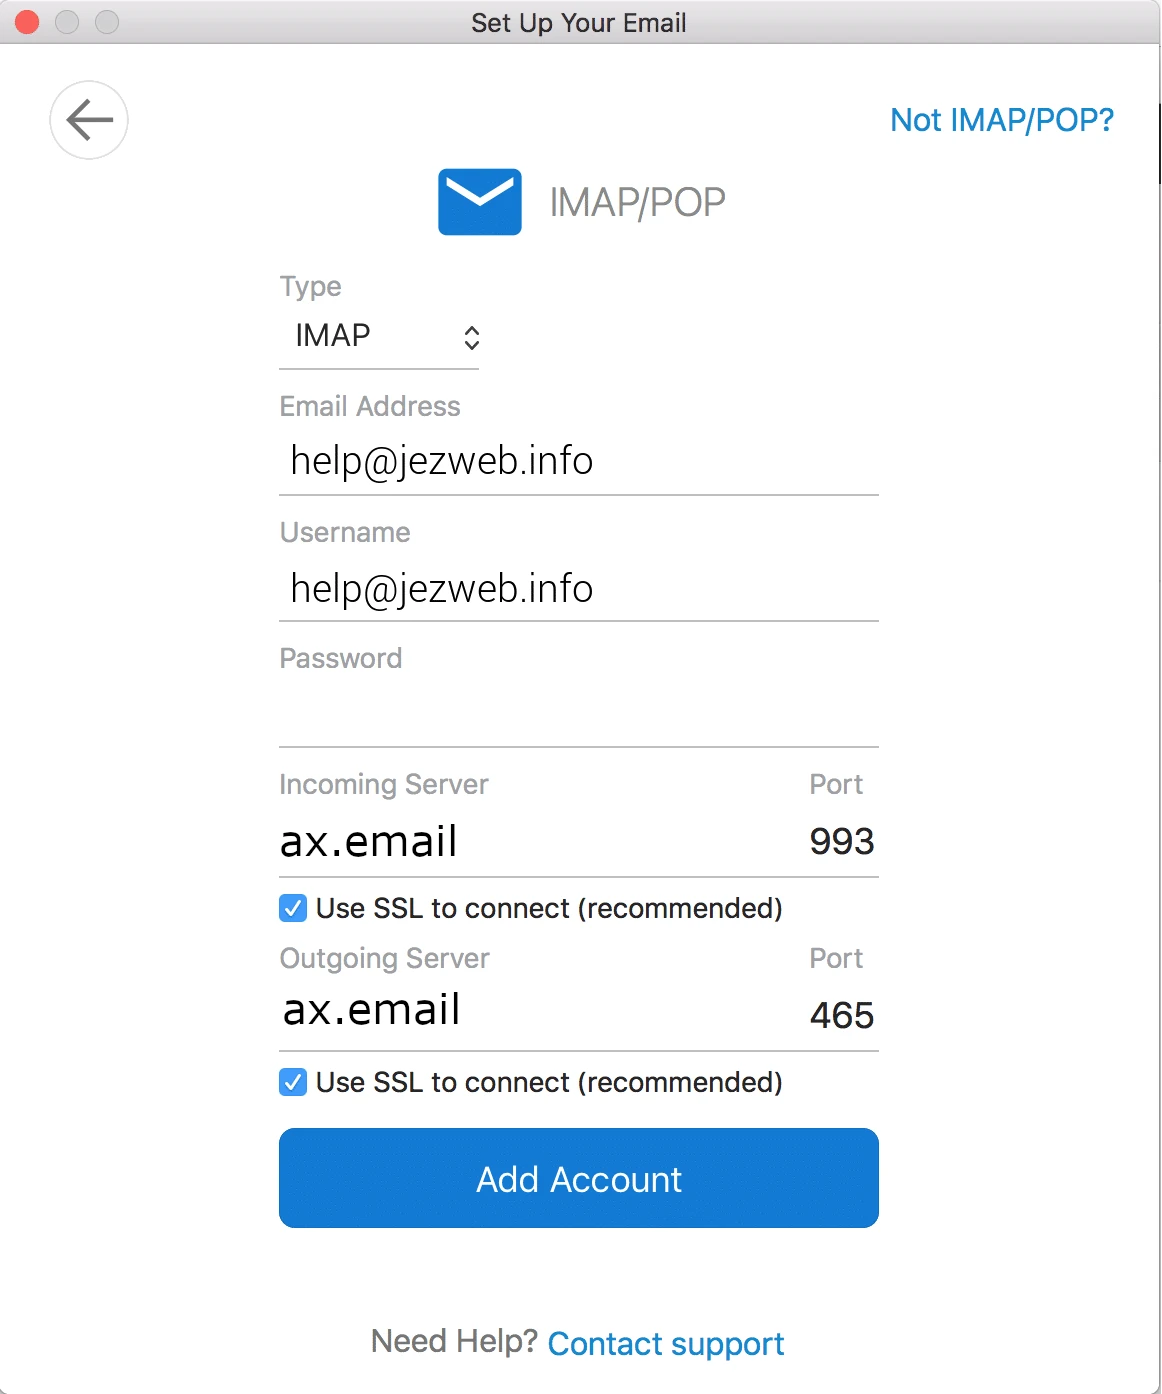
7 – Enter the following details:
Type: IMAP Email address: Your email address Username: Your email address Password: Your mailbox password Incoming Server: ax.email Port: 993 Use SSL to connect: Checked Outgoing Server: ax.email Port: 465 Use SSL to connect: Checked Click Add Account.
8 – Click Done
9 – You’re done! You should see the main Outlook window and your email should begin downloading shortly. Please allow 15 minutes for email to download before troubleshooting.
Step 1
Step 3
Step 5
Step 7
Step 2
Step 4
Step 6
Step 8
Apple Mail
1 – Launch Mail. If Mail is not in your dock, Command (⌘) + Space Bar. Then type Mail in the Spotlight search. Press enter to launch the Mail application., Within Mail, click Mail on the top left. Then select Add Account
2 – In the pop-up window, select Other Mail Account
3 – In the next screen, enter the following information: Name: Enter your first and last name Email Address: Enter your email address Password: Enter your mailbox password
4 – Select Sign In. You will see an alert which says Unable to verify account name or password. Along with this alert, you will see more fields that require additional info Fill in the following details: Email Address: your email address User Name: Your email Address (even though it says automatic, fill it in as shown) Password: Your mailbox password Account Type: IMAP Server Information: ax.email (if using our Axigen email server) secure.emailsrvr.com (If using our Rackspace email server) Then click Sign In
Important Note: Apple Mail will usually clear the User Name field after entering the Incoming and Outgoing Mail Server fields. Ensure your User Name is filled in with your email address after entering the server information and before clicking Sign in
5 – Select the desired syncing options. You can leave the defaults on.
6 – Finally, go back to the Mail app. Your email should begin downloading shortly, if it hasn’t already. Please wait 15 minutes for mail to download before troubleshooting any issues.
Step by step screenshots
Click to Enlarge
Step 1
Step 2
Step 3
Step 4
Step 5
Thunderbird
1 – Open Mozilla Thunderbird, Enter your name, email address and password and select Configure Manually.
2 – Enter the following server details: Your name: Name shown on outgoing emails Email address: Your Email Address Password: your mailbox password Incoming Server Protocol: IMAP Hostname: ax.email Port: 993 Connection Security: SSL/TLS Authentication Method: Autodetect Username: Your Email Address Outgoing Server Hostname: ax.email Port: 465 Connection Security: SSL/TLS Authentication Method: Autodetect Username: Your Email Address Select Re-test
3 – Select Done
4 – Select Finish
5 – Select set as default
6 – You are all set! Go back to the main menu, open the Email app and your messages should start syncing. Please give it a few minutes to download data before troubleshooting
Step by step screenshots
Click to Enlarge
Step 1
Step 2
Step 3
Step 4
Step 5
Step 6
Other Email Tasks
Expand for More Details
Change your Password - Axigen
Step By step guide
1 – Open your web browser and navigate to ax.email (Axigen WebMail) and login
2 – Once logged in click on the settings cog on the bottom left of the screen and choose settings
3 – Under the general tab under Out-of-office Auto-responder, Under the Password Change heading, Choose Change
4 – Enter your current password then enter your password twice, Once done click Save.
5 – Now choose Save & Close.
6 – Now log out and back in (Via the Cog on the bottom left) to test your changes.
Congratulations, you have now changed your password for you Axigen Email.
Setup Email Forward - Axigen
Step By step guide
1 – Open your web browser and navigate to ax.email (Axigen WebMail) and login
2 – Once logged in click on the settings cog on the bottom left of the screen and choose settings
3 – Under the filters tab selct +Add Filter
4 – Give your forward a name, select all incoming emails from the dropdown box, then select Next. 5 – Select the Forward to checkbox, enter your forwarding address and then click finish.
6 – Select Save & Close and your done, your emails will be forwarded to the nominated email address.
Step 1
Step 3
Step 5
Step 2
Step 4
Step 6
Out of Office Notification - Axigen
Step By step guide
1 – Open your web browser and navigate to ax.email (Axigen WebMail) and login
2 – Once logged in click on the settings cog on the bottom left of the screen and choose settings
3 – Under the general tab under Out-of-office Auto-responder, Choose Enable out-of-office auto-responder Check box, enter your start and end date, Subject and message once done click Save & Close.
4 – Congratulations, you have configured an out office message for Synergy Mail.
Step 1
Step 3
Step 2
Create Email Signature - Axigen
1 – Open your web browser and navigate to ax.email (Axigen WebMail) and login
2 – Once logged in click on the settings cog on the bottom left of the screen and choose settings
3 – Uner the general tab under Signatures, Select add Signature
4 – Give your signature a name, Add your signature content and select Add once Done 5 – Select Save & Close 6 – To enable your signature select the +New Button to start a new message then select the Pen icon at the top of the window and select you new signature. your new signature will automaticly appear next time you compose a new message.
Step 1
Step 3
Step 5
Step 2
Step 4
Step 6
Dualmon - Remote Assistance
Enabling Dualmon On MacOS
1 – Open the Apple menu at the top left of the screen
2 – Click on and open “System Settings”
3 – On the menu on the left of the window Scroll down and find then click on “Privacy & Security’
4 – Now on the Right Side menu find and click on “Accessibility”
5 – In the list find “DMserver” and enable it using the toggle
6 – Next use the back Arrow to return to the “Privacy & Security screen.
7 – Next scroll down the the menu on the right until you find “Screen & System Audio Recording and Click into it
8 – In the list find “DMserver” and enable it using the toggle.
9 – you may then receive a dialog box saying you need to “Quit and Reopen” you may need to to do this to enable control for us. This will end the session and you may need to get another Assist Code from us and re enable the session (this should only be the first time we connect to your device).